Discover how a bimodal integration strategy can address the major data management challenges facing your organization today.
Get the Report →Create Dynamics GP Dataflows on PowerBI.com
Connect to the CData Power BI Connectors from PowerBI.com to create Power BI Dataflows with real-time data.
The CData Power BI Connector for Dynamics GP seamlessly integrates with the tools and wizards in Power BI, including the real-time data workflows on PowerBI.com. Follow the steps below to pull data directly into DataFlows on PowerBI.com and use the Power BI Gateway to configure automatic refresh.
Create a DSN
Installing the Power BI Connector creates a DSN (data source name) called CData Power BI Dynamics GP. This the name of the DSN that Power BI uses to request a connection to the data source. Configure the DSN by filling in the required connection properties.
You can use the Microsoft ODBC Data Source Administrator to create a new DSN or configure (and rename) an existing DSN: From the Start menu, enter "ODBC Data Sources." Ensure that you run the version of the ODBC Administrator that corresponds to the bitness of your Power BI Desktop installation (32-bit or 64-bit).
To authenticate set the User and Password connection properties.
To connect set the URL to the Web services endpoint; for example, http://{servername}:{port}/Dynamics/GPService. Additionally, set CompanyId; you can obtain this value in the company setup window: Click Tools -> Setup -> Company.
By default, data summaries are not returned to save performance. Set LookupIds to true to return details such as line items; however, note that entities must be retrieved one at a time.
Pulling Dynamics GP Data Directly Into Your Dataflow
With the data source configured, follow the steps below to load data from Dynamics GP tables into your DataFlow.
Set Up the Power BI Gateway
Follow the steps below to configure the gateway on your machine:
- Run the CData Power BI Connector installer. If you have not already done so, download the Power BI Gateway.
- Select the on-premises data gateway (recommended) option.
- Sign into the gateway.
- Name the gateway and specify a recovery key.
In the Connectors step, choose a folder where the gateway will look for the CData Power BI Connector. This article uses C:\Users\PBIEgwService\Documents\Power BI Desktop\Custom Connectors\. Copy the .pqx files for the CData Connector (found in C:\Users\USERNAME\Documents\Power BI Desktop\Custom Connectors\) to the folder you configured.
NOTE: The account configured for the service (NT SERVICE\PBIEgwService) needs to be able to access the folder chosen for the gateway. If needed, you can change the service account in the Service Settings section of the gateway installer.
- Confirm that the entry CData.PowerBI.DynamicsGP is displayed in the list in the Connectors section.
![CData Power BI Connectors in the On-Premises Data Gateway.]()
Set up Power BI Online for a Dataflow
- In Power BI Online, create a new workspace, which is also known as an app, if you do not already have one. Note that this is only available with Power BI Pro or higher.
- Set up your On-Premises Gateway. The steps for this are in the Configuring the Gateway section of this article.
-
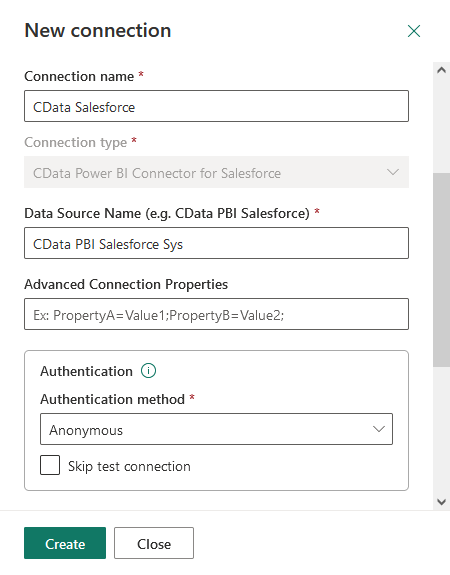
Go back to Power BI Online. In settings, go to 'Manage Gateways', and add a new data source to your Gateway
- Enter the Data Source Name, the name that the data source will be referred to within Power BI Online
- Select the Data Source Type, (e.g. CData Power BI Connector for Dynamics GP) and set the Data Source Name (e.g. CData Power BI Dynamics GP)
- Set Authentication Method to "Anonymous"
![Configuring the connection for the gateway.]()
- Set Privacy Level as needed
-
Click Add to finish the configuration (do not skip the test connection as it is important to know if a successful connection was made).
If you would like to manage the users that have access to this data source, you can go to the Users tab.
Set up your Dataflow and pull the Dynamics GP data
- In the new workspace, go to Create > Dataflow > Add New Entities.
-
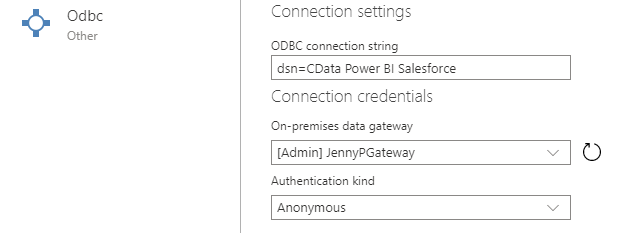
Choose the ODBC data source and enter the correct connection properties.
![Connect to the data source for the CData Power BI connector.]() Enter your DSN name in the ODBC connection string section, dsn=CData Power BI DynamicsGP. Choose your gateway and set the authentication type to Anonymous.
Enter your DSN name in the ODBC connection string section, dsn=CData Power BI DynamicsGP. Choose your gateway and set the authentication type to Anonymous.
-
Choose the table(s) you want to work with and click Transform data.
If you want to make any changes to the query, you can right click on the query and click on Advanced Editor.
Configure Data Refresh on PowerBI.com
Refresh your dataflow to have the most up to date data.
- To refresh manually, open the dataflow options menu from your workspace -> Dataflows and click Refresh Now.
- To schedule refreshes, open the dataflow options menu from your workspace -> Dataflows and click Schedule Refresh. Enable the option to keep your data up to date. Specify the refresh frequency in the menus.

At this point, you will have a Dataflow built on top of live Dynamics GP data. Learn more about the CData Power BI Connectors for Dynamics GP and download a free trial from the CData Power BI Connector for Dynamics GP page. Let our Support Team know if you have any questions.


 Enter your DSN name in the ODBC connection string section, dsn=CData Power BI DynamicsGP. Choose your gateway and set the authentication type to Anonymous.
