Discover how a bimodal integration strategy can address the major data management challenges facing your organization today.
Get the Report →Connect Cloud Quickstart
CData Connect Cloud provides data connectivity as a service: access your data where you want it, no matter where it comes from and without installing any software or writing any code. This article includes everything you need to know to quickly get started using Connect Cloud and familiarize yourself with the core features at your disposal.
- Step 1: Navigate to the Connect Cloud Service
- Step 2: Log In or Sign Up
- Step 3: Create Your First Connection
- Step 4: Enable Your Preferred Data Client
- Step 5: Use Your New Data Pipeline
- Next Steps: Additional Features
Step 1: Navigate to the Connect Cloud Service
Connect Cloud is a cloud-hosted service, meaning that access to the platform is simply a matter of navigating to a URL and authenticating via a web portal. All you need for getting started with Connect Cloud is the following web page:
cloud.cdata.com
Navigating to this URL brings up the welcome screen and login portal:

Step 2: Log In or Sign Up
The first time you navigate to Connect Cloud's domain, you will need to sign up for a new account. Signing up begins the fully functional free trial period for Connect Cloud, allowing you to confirm its ability to provide your desired data connectivity needs.
During signup, enter an email to be associated with the account, and password to use during future logins. Completing signup simply requires clicking a verification link sent to the specified email.
Step 3: Create Your First Connection
After logging in, Connect Cloud brings you to the Overview page. This page helps you understand Connect Cloud's operation at a glance, but this will only become relevant after creating at least one connection.
To begin creating connections, navigate to the Connections tab:

This is where you configure Connect Cloud's access to different elements of your data ecosystem, like enterprise SaaS applications, databases, and other data storage platforms. These connections will be used later to pipe data to the applications within which you want to work with your data -- reporting tools, analytics platforms, and so on.
Clicking on the Add Connection button brings up the list of available data sources:

For the sake of this article, we will use Salesforce as an example data source -- we want to visualize our Salesforce data in some other data client (e.g. Google Sheets, Looker Studio, PowerBI, etc). After selecting Salesforce from the list, we see the page with connection parameters for the new Salesforce connection:

By default, Connect Cloud uses OAuth to authenticate with Salesforce; in other words, Connect Cloud redirects the user to a Salesforce login portal, the user's Salesforce credentials are entered there, and then the user is redirected back to Connect Cloud. Connect Cloud supports other methods of authenticating, and this can be configured in the Advanced Settings tab within this connection creation page. For the purposes of this guide, however, we will use OAuth.
The Sign In option within the authentication settings begins the redirect to Salesforce. The resulting Salesforce web portal requires the user credentials that would normally be used to access the Salesforce web dashboard. After entering these credentials, the access granted by them is then extended to Connect Cloud.
After a successful OAuth authentication (included a green success banner), the Create and Test button can be used to save these connection parameters and verify that Connect Cloud can talk to Salesforce.
Step 4: Enable Your Preferred Data Client
After connecting to a data source like Salesforce, it's time to consider the data destination: the data client in which you prefer to visualize and interact with your data. Clicking to the Clients tab shows the list of supported data clients:

Clicking on a data client brings up the simple steps required to allow Connect Cloud access to this application. For this example, clicking on Google Sheets brings up the Google Marketplace page for installing the free Connect Cloud extension for Google Sheets:

Other data clients not used in this example follow a similar setup: clicking on Looker Studio brings up the Looker Studio page for enabling Connect Cloud as a data source, and so on.
After enabling your preferred data client, your first Connect Cloud data pipeline is ready to go! All other steps occur outside of Connect Cloud, within your data client of choice.
Step 5: Use Your New Data Pipeline
The last step for accesing your data through a Cloud Connect pipeline depends on the specific data client you want to use. For this example, we can see the Connect Cloud extension in Google Sheets:

Clicking on this extension brings up the Connect Cloud extension interface, through which you can authorize the Connect Cloud data pipeline. After authorization, the Import button allows for connecting Salesforce data to the current Google Sheet.
The Import interface requires two basic parameters to begin importing data:
- The Connection to use from within Connect Cloud's configured Connections
- The "table" (or data object) within the selected data source to import data from
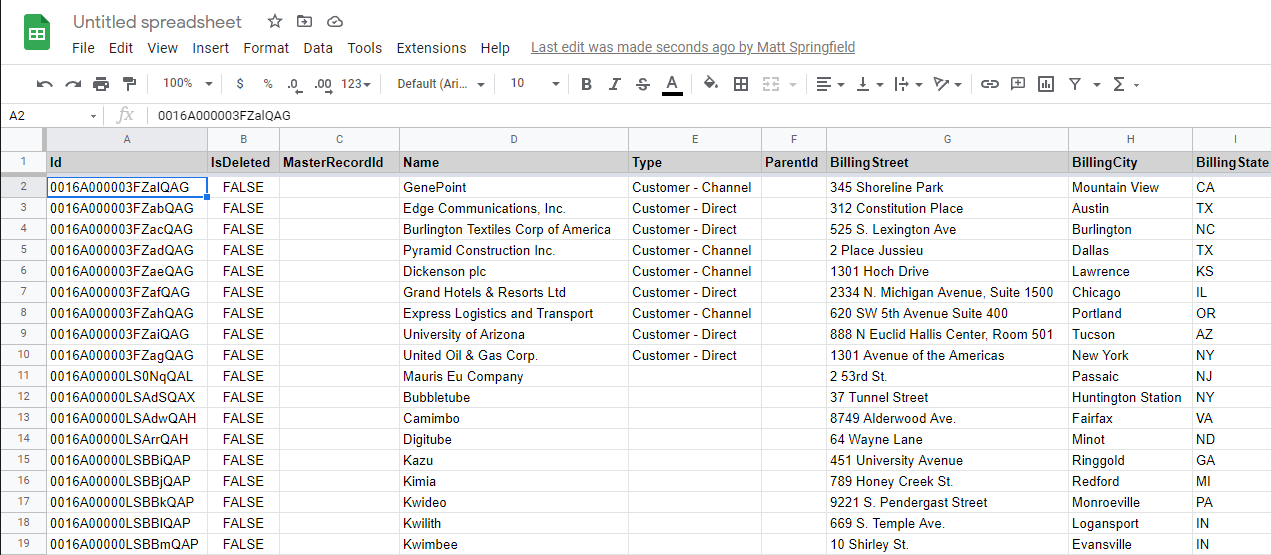
For example, you can access the data from your Salesforce accounts by selecting the Salesforce1 connection created in step 3, then the Account table within that data source:

The remaining options within the Import interface can be used to specify which columns within the Account table, but these can be left as default for our example here.
At this point the only thing remaining is to Execute the import, confirm that the imported data should populate the current spreadsheet, and view the results:

And that's it! This process can be repeated for additional data sources and clients to view your full data ecosystem in whichever data analysis tool you prefer.
Next Steps: User Management, OData, and Data Explorer
After configuring your first pipeline, there are additional features within Connect Cloud that you may wish to explore:
- Managing the users who can access your Connect Cloud account
- Building an OData model of the data accessible through Connect Cloud
- Querying your data directly through Connect Cloud
User Management
The Users tab lists the users who have permission to log into your Connect Cloud platform. Users can be added, edited, and removed through this interface.
The email used during the signup process will automatically be the first (and currently only) user in the list. Additional users are invited via their email, and must verify their account email through the same process as the original user.
OData
The OData tab provides functionality required to query Connect Cloud with OData-formatted queries and receive the data from your Connect Cloud connections. This allows you to interact with your data in a query-response model that may be more flexible than accesing your data within any particular data client.
In order for your data to be accessible via OData queries, you must add each "table" (or data object) from your data source(s) that you want to expose. Adding a new data table is a simple matter of selecting a configured Connection and choosing one of the available tables from the dynamically-populated dropdown menu.
Data Explorer
The most direct access point for your Connect Cloud data is the Data Explorer tab.
Within this tab, you can run custom SQL queries against the data in any of your configured Connections and the data tables within those data sources. Your custom SQL queries are automatically converted (under the hood) to the syntax appropriate from the data source you have chosen -- in other words, you can treat any of your configured data sources as if they were relational databases and "speak" SQL to them.


