Discover how a bimodal integration strategy can address the major data management challenges facing your organization today.
Get the Report →How to connect SharePoint with QuickBooks Time Data through external lists
Provide QuickBooks Time data to SharePoint users as an external list.
You can use the CData API Server with the ADO.NET Provider for QuickBooks Time (or any of 200+ other ADO.NET Providers) to give your users the capabilities to access QuickBooks Time data in SharePoint. This article shows how to create an external list of QuickBooks Time data that is always up to date. You will use an external content type as a template to create the external list. The external content type enables connectivity through OData, a real-time data streaming protocol for mobile and other online applications. The API Server is an OData producer of QuickBooks Time feeds.
After setting up the API Server, creating an external list with connectivity to QuickBooks Time data consists of three basic steps:
This article also covers how to accomplish the following tasks:
Set Up the API Server
Follow the steps below to begin producing secure QuickBooks Time OData services:
Deploy
The API Server runs on your own server. On Windows, you can deploy using the stand-alone server or IIS. On a Java servlet container, drop in the API Server WAR file. See the help documentation for more information and how-tos.
The API Server is also easy to deploy on Microsoft Azure, Amazon EC2, and Heroku.
Connect to QuickBooks Time
After you deploy the API Server and the ADO.NET Provider for QuickBooks Time, provide authentication values and other connection properties needed to connect to QuickBooks Time by clicking Settings -> Connections and adding a new connection in the API Server administration console.
TSheets uses the OAuth2 standard for authentication and authorization. To construct your own OAuth app and connect to data, refer to OAuth section in the Help.
SharePoint consumes OData 3.0 data sources. You can configure the API Server for compatibility with SharePoint by clicking Settings -> Server and then selecting OData 3.0 in the Default OData Version menu.
You can then choose the QuickBooks Time entities you want to allow the API Server to access by clicking Settings -> Resources.
Authorize API Server Users
After determining the OData services you want to produce, authorize users by clicking Settings -> Users. The API Server uses authtoken-based authentication and supports the major authentication schemes. Access can also be restricted based on IP address; by default only connections to the local machine are allowed. You can authenticate as well as encrypt connections with SSL.
Create the External Content Type
The external content type is a schema that will provide the core connectivity to QuickBooks Time data from any SharePoint app. You can create a schema for any OData query. You can pass in the required options with the $sharepoint query string parameter. Below is an example request, which will return the schema in an .ect file:
https://my-server:8032/api.rsc/Timesheets?$sharepoint=AuthMode:Passthrough&@authtoken=my-authtoken
Note that for simplicity, the authtoken is passed in the query string to authenticate the request for the .ect. This is not enabled by default; if you would like to use this method to authenticate to the API Server, you will need to add an entry like the following to your settings.cfg file:
[Application]
AllowAuthtokenInUrl = true
The settings.cfg file is located in the data directory. In the .NET edition, the data directory is located in the app_data subfolder of the application root. In the Java edition, the location of the data directory depends on your operating system:
- Windows: C:\ProgramData\CData
- Unix or Mac OS X: ~/cdata
Import the External Content Type
After you have created the .ect, you can follow the steps below to import it into SharePoint Online or an on-premise SharePoint installation.
SharePoint 2013
Navigate to the SharePoint central administration portal and click the link to manage service applications. In the resulting page, click Business Data Connectivity Service. Select External Content Types in the menu and click Import. In the BDC Model section, click Choose File to select the .ect file in the dialog.
SharePoint Online
In the SharePoint admin center, click BCS from the quick launch menu and then click Manage BDC Models and External Content Types. On the resulting page, select External Content Types in the menu and click Import. In the BDC Model section, click Choose File.
Create the External List
You can now create SharePoint apps that can access and modify QuickBooks Time data:
- Navigate to your SharePoint site and choose Site Contents -> Add an App -> External List.
- Click the Select External Content Type icon and choose the external content type that you created in the previous section.
- Click Create.

Limit Results
SharePoint has limits on how much data can be retrieved from external lists of OData sources. External lists display results in pages of 30 items by default. To modify the paging size, you can set the Item Limit property in the settings for the default view. Alternatively, you can build a custom Web part to view the data from the external list.
In SharePoint 2013, requests to external data sources are limited by bandwidth throttling controls, which can be changed using the Set-SPBusinessDataCatalogThrottleConfig command. In SharePoint Online, requests to external data sources are limited by your Server Resource Quota and by bandwidth throttling controls; to work around this, you can apply filters in the request for data.
The API Server sets the default limit for the number of returned rows to be 500. You can disable this limit by adding the limit option to the $sharepoint query string parameter and setting its value to 0.
Configure Pass-Through Authentication
To use pass-through authentication for accessing your external content type, set the AuthMode option to pass-through.
If you are using Kerberos authentication, you need to add these users to the API Server. If you are not using Kerberos authentication, you are likely using another form of Windows authentication such as NTLM.
When users are authenticating via NTLM authentication and using pass-through authentication in the Business Connectivity Service (BCS) in SharePoint, SharePoint connects to the external Web service using the default IIS account. This account is often the NT AUTHORITY\IUSR account. Give this user access to the CData API Server.
See the help documentation for a guide to enabling Windows authentication for the API Server.
Configure Credentials Authentication
In the following sections, you will first create a secure store target application that authenticates SharePoint users to the API Server with the credentials for a user who has been added to the API Server. Next, you will create the external content type and configure it to authenticate with the credentials in the secure store.
SharePoint Online
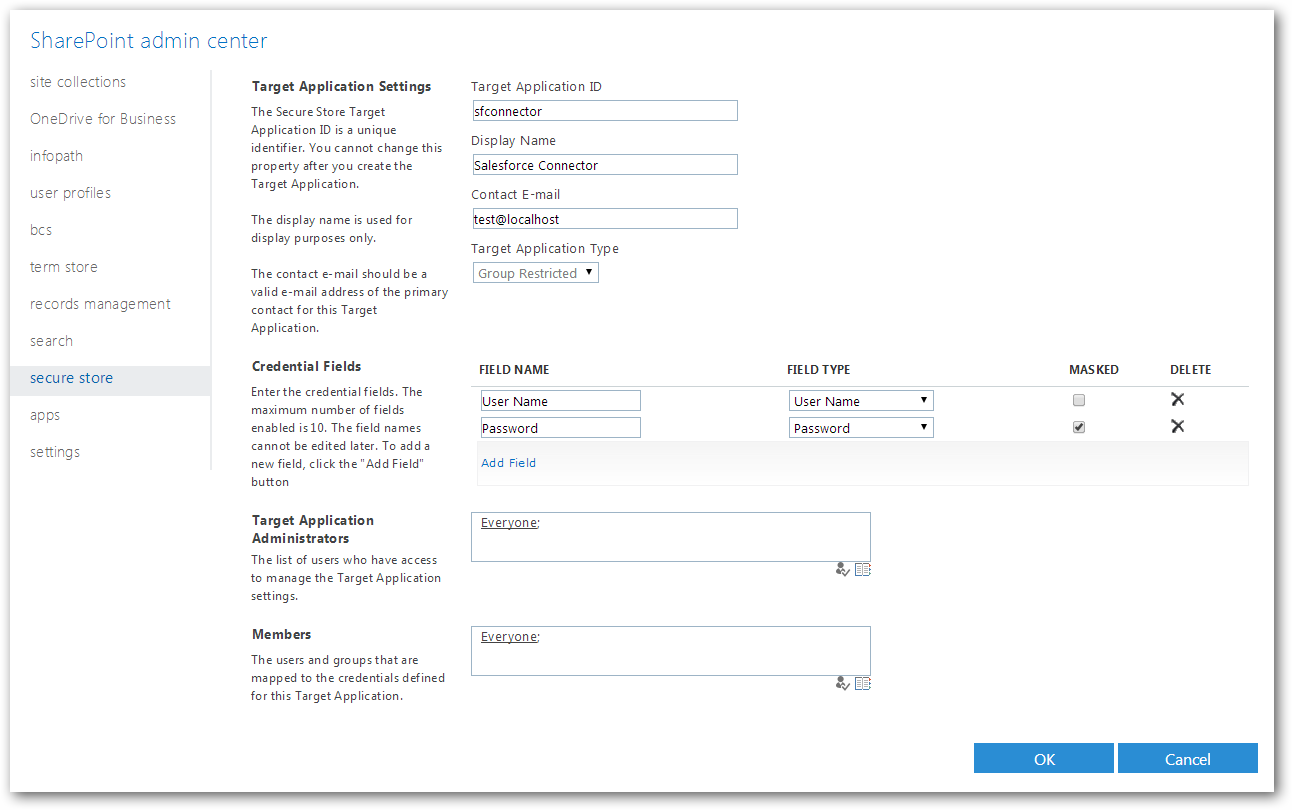
- In the SharePoint Online administration center, click secure store from the quick launch bar and then click New.
- In the Target Application Settings section, enter the target application Id, display name, and contact email.
- In the Credential Fields section, add the credentials for a user in the API Server.
- In the Target Application Administrators section, choose an administrator who can access the connection settings for the external content type. The account for the SharePoint Online administrator is usually specified here.
- In the Members section, enter the users in SharePoint who are authorized to access QuickBooks Time data.
![The configuration page for the new target application in SharePoint Online. (Salesforce is shown.)]()
After you create the target application, save the credentials of The API Server user into the secure store:
- In the quick launch bar, click secure store.
- Click Set Credentials in the menu for the target application.
- Enter the username and password of a user in the API Server.
Next, create a new connection settings object:
- Click BCS from the quick launch bar and then choose the option to manage connections to online services.
- Click Add. Name the connection and enter the URL of the OData endpoint, https://my-server/api.rsc.
- Select the option to use credentials stored in SharePoint. Enter the application Id for the target application you created.
Finally, create the external content type, import it into SharePoint Online, and create the external list:
-
Generate the external content type by making a request for data and specifying the required options in the $sharepoint query string parameter. Set the AuthMode option to Credentials. Specify the target application Id and the Id of the connection settings object. For example:
https://my-server/api.rsc/Timesheets?$filter=JobCodeType eq 'regular'&$sharepoint=AuthMode:Credentials,TargetApplicationId:my-target-application-Id,ODataConnectionSettingsId:my-odata-connection-settings-Id - Import the resulting .ect file: Open BCS from the quick launch bar and click the link to manage BDC models and external content types. Click Import.
- You can now create the external list.
SharePoint 2013
- Browse to the central administration area for your SharePoint site and click the link to manage service applications.
- Click Secure Store Service and then click New.
-
Enter the application Id, display name, and contact email to configure the new secure store target application. Set the target
application type to Group.
![Creating a new target application in SharePoint 2013. (Salesforce is shown.)]()
-
On the next page, add the field names and field types to display when the user enters their username and password. Select the username and password field types.
![The type of authentication used for the API Server.]()
-
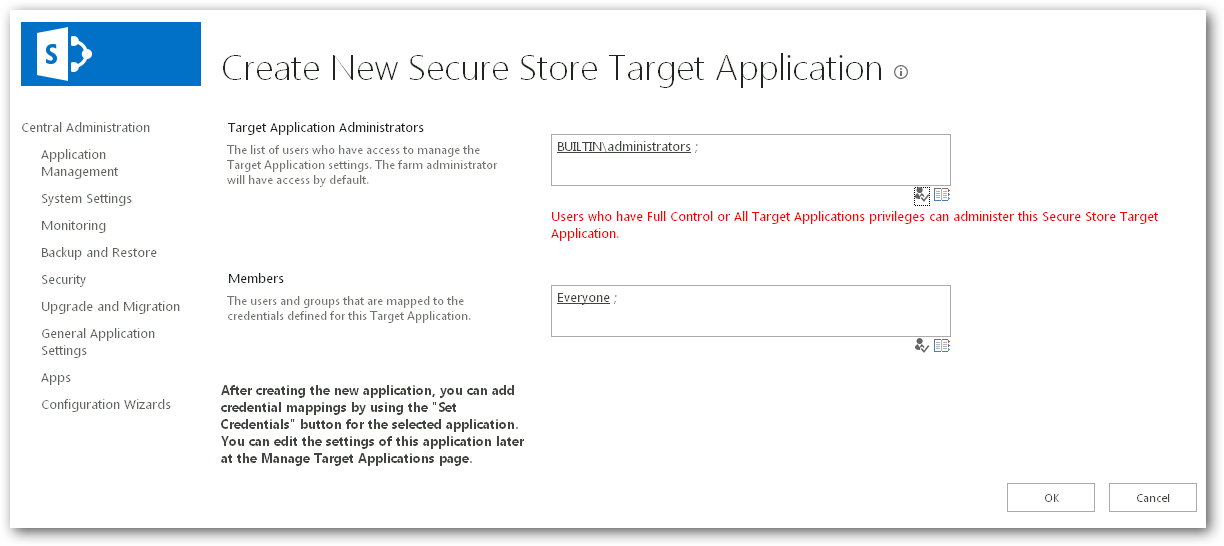
Next, in the Target Application Administrators section, choose administrators who are authorized to access connection
settings for the external content type. In the Members section, enter the users in SharePoint who
are authorized to connect with the credentials of the API Server user.
![Administrators of the external content type and SharePoint users who are authorized to use the API Server.]()
After you create the new secure store target application, follow the procedure below to set the credentials that users in SharePoint will provide when accessing the API Server:
-
Click Set Credentials in the menu for the target application.
![The first step to save credentials to the API Server in the secure store. (Salesforce is shown.)]()
-
In the resulting menu enter the username and password (authtoken) of a user in the API Server.
![The credentials of a user in the API Server. (Salesforce is shown.)]()
-
Open an instance of the SharePoint management shell and initialize a new SharePoint connection object. Note that the connection object is site specific.
New-SPODataConnectionSetting -AuthenticationMode Credentials -ServiceAddressURL http://my-server/api.rsc -ServiceContext http://myspsite/ -Name MyODataConnectionSettingsId -SecureStoreTargetApplicationId my-target-application-IdThe output below shows that the command has executed successfully:
![The initialized connection object.]()
The final steps involve creating the external content type for the table you want to expose in SharePoint, configuring it to authenticate with credentials from the secure store, and then importing it into SharePoint.
- Generate the external content type by making a request for data and specifying the required options in the $sharepoint query string parameter:
Below is an example request:
http://my-server/api.rsc/Account?$filter=Industry eq 'Floppy Disks'&$sharepoint=AuthMode:Credentials,TargetApplicationId:my-target-application-Id,ODataConnectionSettingsId:my-odata-connection-settings-Id - To import the external content type into SharePoint, point your browser to the SharePoint central administration portal and click the link to manage service applications.
- Click Business Data Connectivity Service in the resulting page.
- Click Import and select the .ect file in the dialog.
- You can now create the external list. On the Site Contents page on your SharePoint site, click the button to add an app and then click the icon to choose the external content type.


