Discover how a bimodal integration strategy can address the major data management challenges facing your organization today.
Get the Report →


Build an MVC Application with Connectivity to QuickBooks
This article shows how to use wizards in Visual Studio to create a simple MVC (model, view, controller) project and execute CRUD (create, read, update, and delete) commands to QuickBooks using the Entity Framework methods.
Create the Entity Framework Model
Follow the steps below to save connection properties and map tables to entities in the data model.
- If you are using Entity Framework 6, you will need to take the preliminary step of registering the QuickBooks Entity Framework provider for your project. See the "LINQ and Entity Framework" chapter in the help documentation for a guide.
- Create a new MVC project in Visual Studio. Select the Internet Application template and the Razor view engine. In this example, the project name is MvcQuickBooksApp.
- To add the .edmx file from the designer, click Project -> Add New Item. Select ADO.NET Entity Data Model, name the model, and click Add. In this example, the name of the model is QuickBooksModel.
- In the Entity Data Model wizard, select the option 'EF Designer from database'. The Entity Data Model wizard is displayed.
- Click New Connection. Select CData QuickBooks Data Source in the dialog that is displayed.
Specify the required connection string properties.
To connect to QuickBooks Desktop, use the Remote Connector application included with the installation. The Remote Connector is a lightweight, stand-alone server that enables you to connect to remote QuickBooks instances. It is also used to connect your application to QuickBooks in situations where direct COM access to QuickBooks is not available (e.g., ASP.NET, Java, or a company file on a remote machine). For more information and a step-by-step guide to establish a connection, refer to the "Getting Started" guide in the help documentation.
A typical connection string is below:
URL=http://localhost:2080;Password=test;User=test;
![]()
Name the connection and select whether to include sensitive information, such as connection credentials, in the connection string. For simplicity, this example saves sensitive information in Web.config.
![]()
- Select the tables and views you need. In this example, Customers is imported. Also, the option to pluralize object names is deselected in this example. Click Finish to create the .edmx file.
![]()
- Build your project to complete this step.


Create the Controller and Views
After creating the Model and building the project, you can then follow the procedure below to create the Controller, the Views, and the corresponding CRUD methods. The views for each action allowed for the Customers table are saved as .cshtml files located in the Customers subfolder under Views.
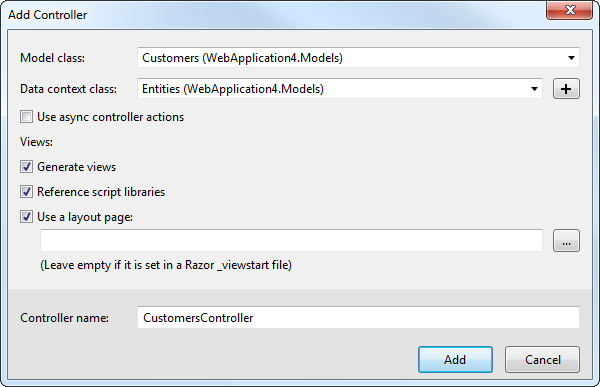
In Solution Explorer, right-click the Controllers folder and click Add -> Controller. Name the Controller, for example, QuickBooksController, and set the following options:
- Template: Select the following option: 'Controller with read/write actions, using Entity Framework'.
- Model class: Select Customers.
- Data context class: Select QuickBooksEntities.
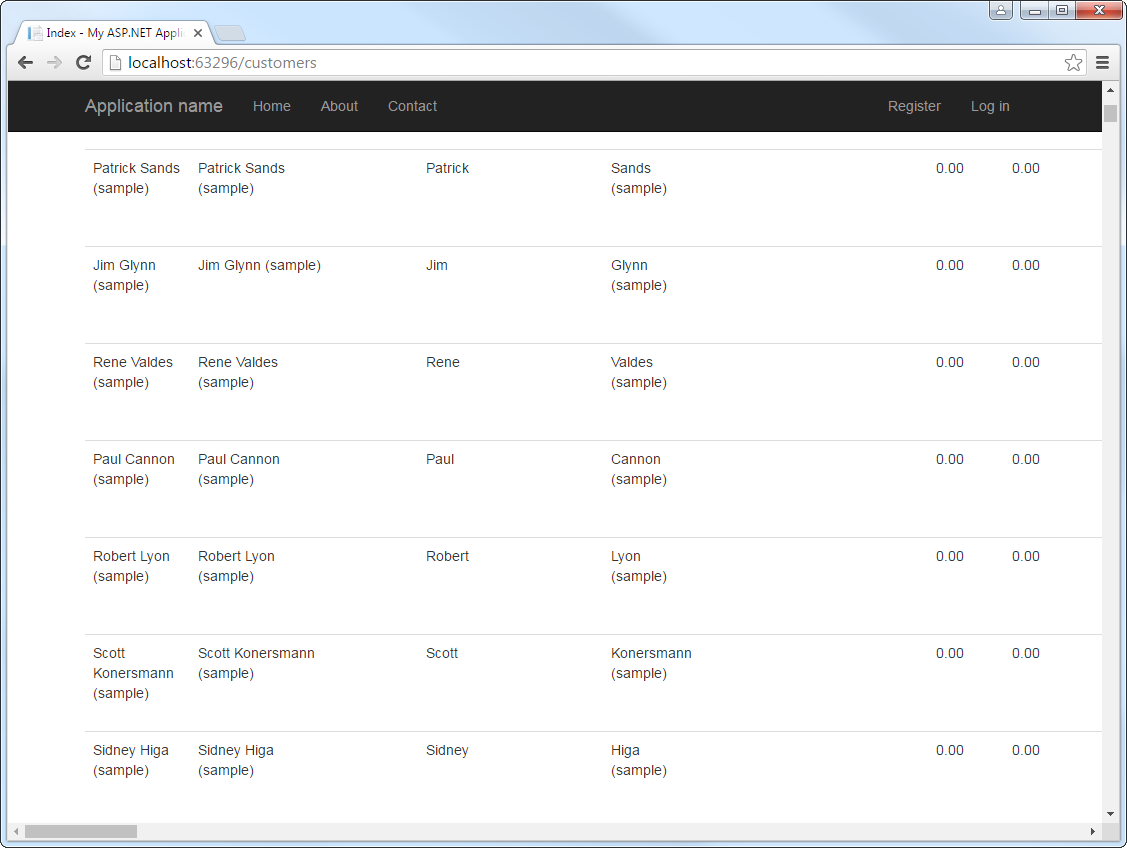
You can now run the project. To access the Index view, append "QuickBooks" to the URL. Click Create New to navigate to the Create view, which contains an automatically generated form. Click the Edit and Delete links, next to each record, to display the corresponding Edit or Delete view.
Create a Controller from Scratch
This section details how to implement CRUD commands in just a few lines of code. The available wizards are detailed at each step.
You will need to create an entity data model before beginning this tutorial: You will use the methods of the context class to execute commands to QuickBooks. See the preceding section to use the Entity Framework Data Model wizard to create a model — this is the model-first approach. See the "LINQ and Entity Framework" chapter in the help documentation for a guide to using the code-first approach.
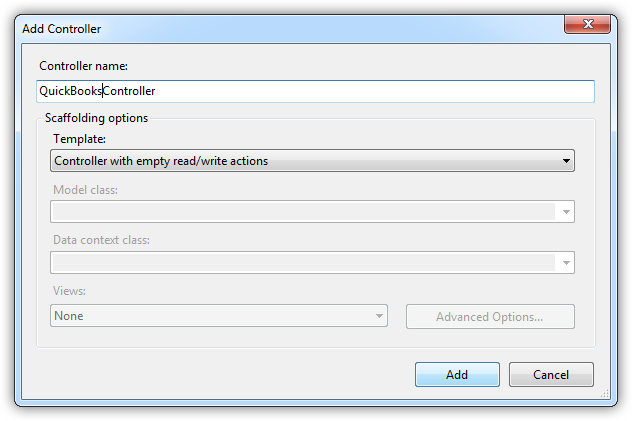
- To create a controller manually, QuickBooksController in the examples below, right-click the Controllers folder in the Solution Explorer and click Add -> Controller.
- In the resulting Add Controller dialog, select the option 'Controller with empty read/write actions' in the Template menu. QuickBooksController.cs is created in the Controller folder.
Create the Context
Add the code below to instantiate the context class as a class variable. In this simple example, the controller will execute CRUD commands by directly invoking the methods of the context class.
private QuickBooksEntities db = new QuickBooksEntities();
Retrieve QuickBooks Data Entities
To display a list of records in a view, modify the Index method to match the code below. The code below calls the ToList() method of the context class and returns a view that displays a table of records; the default Index method returns an empty view.
public ActionResult Index() {
return View(db.Customers.ToList());
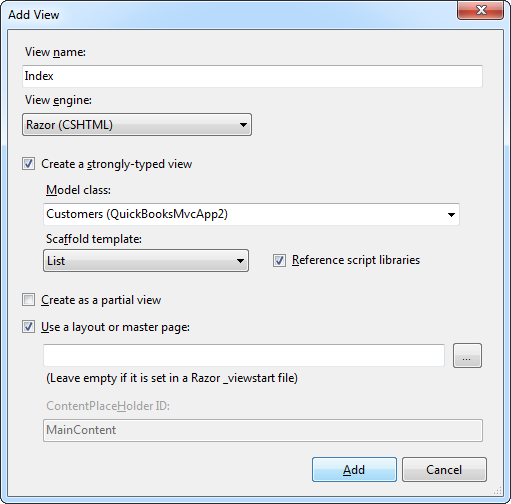
}To create the view, right-click inside the Index method and click Add View. In the resulting wizard, you will create a new view, Index.cshtml, which is saved in the Views folder. You can load this view by right-clicking the .cshtml file and then clicking View In Page Inspector.
In the Add View dialog, name the view and set the following options:
- Create a strongly typed view: Select this option to create a view of the Customers type.
- Model class: Select the Customers entity, Customers.
- Scaffold template: Select the List option. This menu option generates the HTML table that displays the entities.
Create QuickBooks Entities
To create a record you will need to create a view that will receive the Customers entity submitted by the user in a form. Follow the procedure below to implement the create action:
- Override the second Create method, annotated with the HttpPost attribute. This method processes the data when the user submits it back. The first method simply displays the form, so you do not need to override this behavior.
- Replace the default input, a FormCollection, with the type of QuickBooks entity you want to allow users to create.
Add the code below to add the new record through the Entity Framework: In the following code example, the Add and SaveChanges methods of the context are called to insert the record.
[HttpPost]
public ActionResult Create(Customers customers)
{
  try {
    db.Customers.Add(customers);
    db.SaveChanges();
    return RedirectToAction("Index");
  } catch {
    return View();
  }
}
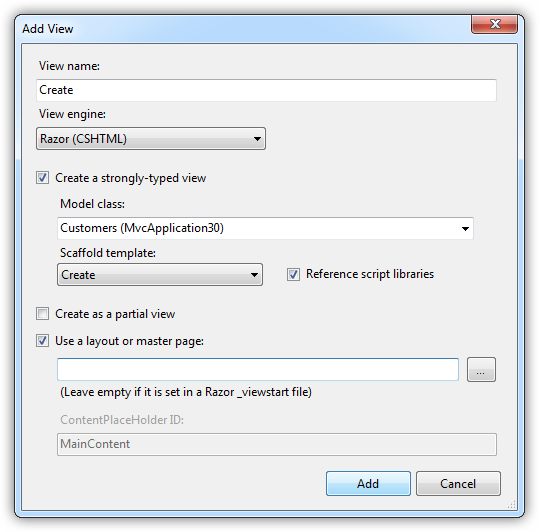
You will need to add only one view for the Create action. The new view, Create.cshtml, will be added to the QuickBooks data subfolder in Views, alongside Index.cshtml. Right-click inside either of the Create methods and click Add -> View. In the resulting Add View dialog, set the following options:
- Create a strongly typed view: Select this option to create a view of the Customers type.
- Model class: Select the Customers entity.
- Scaffold template: Select Create to generate the HTML for the form.
Edit and Save QuickBooks Entities
To edit a record in QuickBooks data, you will need to receive input from a view and execute a command to the data source, as with the Create method. Additionally, you will need to define another aspect of the Edit action: the controller's Edit method will need to update the context with the state of the changed entity. These three steps are shown below:
-
Override the first Edit method to match the code below. When a user clicks the Edit link for the Customers, this method sends the selected Customers entity to a view where it can be modified in a form.
public ActionResult Edit(int id) { return View(db.Customers.Find(id)); } - Right-click the first Edit method and click Add -> View. Like the Create action, only one Edit view is needed. Set the following options in the resulting wizard:
- Create a strongly typed view: Select this option to create a view of the Customers type. Select Customers in the menu.
- Model class: In the menu, select the entity, Customers (MvcApplication.Models).
- Scaffold template: In the menu, select Edit to generate the HTML for the form.
-
Override the second Edit method with the following code example. As annotated by the HttpPost attribute, this method receives data from the view when the user submits their modifications in the form.
If the posted values can be used to update a Customer record, QuickBooks is updated when the SaveChanges method is called. If the posted values are not valid, for example, a provided data type is not correct, they are redisplayed in the form.
The view you created for the first Edit method displays the form. The Edit view also includes a Html.ValidationMessageFor helper that displays the error message.
[HttpPost]
public ActionResult Edit(Customers customers) {
  if (ModelState.IsValid) {
    db.Entry(customers).State = EntityState.Modified;
    db.SaveChanges();
    return RedirectToAction("Index");
  }
  return View(customers);
}

Delete QuickBooks Data Entities
Below is the code for the first Delete method, which returns a view of the Customers entity to delete.
public ActionResult Delete(string id) {
Customers customers = db.Customers.Find(id);
return View(customers);
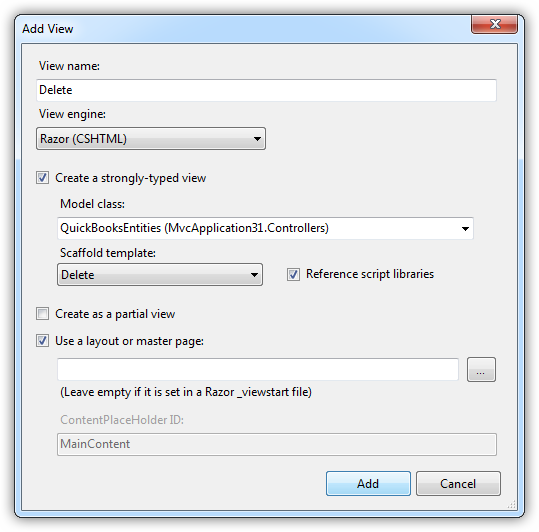
}Right-click inside this method and click Add -> View. In the resulting dialog, enter the following information:
- Create a strongly typed view: Select this option to create a view of the Customers type.
- Model class: In the menu, select the Customers entity.
- Scaffold template: In the menu, select Delete to generate the HTML for the form.
After creating a view, use the code below for the DeleteConfirmed method, which deletes the entity when the postback confirming the delete is received from the user.
\[HttpPost, ActionName("Delete")]
public ActionResult DeleteConfirmed(string id) {
  Customers customers = db.Customers.Find(id);
  db.Customers.Remove(customers);
  db.SaveChanges();
  return RedirectToAction("Index");
}
Sample Project
Get started with using QuickBooks in MVC with the C# demo or VB.NET demo. You will also need to install the [service] ADO.NET Data Provider to run the demo. Free trials are available. To use this demo, you will also need to modify the connection string in the Web.config file.
Data Connectors
ETL/ ELT Solutions
Cloud & API Connectivity
OEM & Custom Drivers