Discover how a bimodal integration strategy can address the major data management challenges facing your organization today.
Get the Report →Trigger Certinia IFTTT Flows in Azure App Service
This article shows how to automate IFTTT (if-this-then-that) workflows with standard wizards in Logic Apps.
Through standards-based interfaces like OData and Swagger, the CData API Server, when paired with the ADO.NET Provider for Certinia (or any of 200+ other ADO.NET Providers), provides a native experience in Logic Apps and Power Automate with Certinia. OData enables real-time connectivity to data; Swagger enables scaffolding, or code generation, of wizards in Logic Apps and Power Automate, as well as scaffolding Power Apps. This article shows how to add Certinia to an IFTTT (if-this-then-that) workflow in a Logic App.
Set Up the API Server
Follow the steps below to begin producing secure and Swagger-enabled Certinia APIs:
Deploy
The API Server runs on your own server. On Windows, you can deploy using the stand-alone server or IIS. On a Java servlet container, drop in the API Server WAR file. See the help documentation for more information and how-tos.
The API Server is also easy to deploy on Microsoft Azure, Amazon EC2, and Heroku.
Connect to Certinia
After you deploy the API Server and the ADO.NET Provider for Certinia, provide authentication values and other connection properties by clicking Settings -> Connections and adding a new connection in the API Server administration console. You can then choose the entities you want to allow the API Server access to by clicking Settings -> Resources.
There are several authentication methods available for connecting to Certinia: login credentials, SSO, and OAuth.
Authenticating with a Login and Token
Set the User and Password to your login credentials. Additionally, set the SecurityToken. By default, the SecurityToken is required, but you can make it optional by allowing a range of trusted IP addresses.
To disable the security token:
- Log in to Certinia and enter "Network Access" in the Quick Find box in the setup section.
- Add your IP address to the list of trusted IP addresses.
To obtain the security token:
- Open the personal information page on certinia.com.
- Click the link to reset your security token. The token will be emailed to you.
- Specify the security token in the SecurityToken connection property or append it to the Password.
Authenticating with OAuth
If you do not have access to the user name and password or do not want to require them, use the OAuth user consent flow. See the OAuth section in the Help for an authentication guide.
Connecting to Certinia Sandbox Accounts
Set UseSandbox to true (false by default) to use a Certinia sandbox account. Ensure that you specify a sandbox user name in User.
You will also need to enable CORS and define the following sections on the Settings -> Server page. As an alternative, you can select the option to allow all domains without '*'.
- Access-Control-Allow-Origin: Set this to a value of '*'. An Access-Control-Allow-Origin header value of '*' is required to use the API Server in the Logic Apps Designer.
- Access-Control-Allow-Methods: Set this to a value of "GET,PUT,POST,OPTIONS".
- Access-Control-Allow-Headers: Set this to "x-ms-client-request-id, authorization, content-type".
Authorize API Server Users
After determining the OData services you want to produce, authorize users by clicking Settings -> Users. The API Server uses authtoken-based authentication and supports the major authentication schemes. You can authenticate as well as encrypt connections with SSL. Access can also be restricted by IP address; access is restricted to only the local machine by default.
For simplicity, we will allow the authtoken for API users to be passed in the URL. You will need to add a setting in the Application section of the settings.cfg file, located in the data directory. On Windows, this is the app_data subfolder in the application root. In the Java edition, the location of the data directory depends on your operation system:
- Windows: C:\ProgramData\CData
- Unix or Mac OS X: ~/cdata
[Application]
AllowAuthtokenInURL = true
Access Certinia in a Logic App
You can use the API Server in a Logic App to create process flows around Certinia data. The HTTP + Swagger action provides a wizard to define the operations you want to execute to Certinia. The following steps below show how to retrieve Certinia data in a Logic App.
If your table has a column containing the creation date of a record, you can follow the steps below to write a function to check the column values for any new records. Otherwise, skip to the Create a Logic App section to send out emails to entities that match a filter.
Check for New Certinia Entities
To find new Certinia entities since a certain time, you can write a function that retrieves a datetime value for the start of the interval:
- In the Azure Portal, click New -> Function App -> Create.
- Enter a name and select the subscription, resource group, App Service plan, and storage account.
- Select your Function App and select the Webhook + API scenario.
- Select the language. This article uses JavaScript.
- Add the following code to return the previous hour in a JSON object:
module.exports = function (context, data) {
  var d = new Date();
  d.setHours(d.getHours()-1);
  // Response of the function to be used later.
  context.res = {
    body: {
      start: d
    }
  };
  context.done();
};
Add Certinia to a Trigger
Follow the steps below to create a trigger that searches Certinia for results that match a filter. If you created the function above, you can search for objects that were created after the start of the interval returned.
- In the Azure Portal, click New and in the Web + Mobile section select Logic App and select a resource group and App Service plan.
- You can then use the wizards available in the Logic App Designer, which can be accessed from the settings blade for the Logic App. Select the Blank Logic App template.
- Add a Recurrence action that will poll for the Certinia objects. This article polls every hour. Select the timezone -- the default is UTC.
- Add a function action: Expand the menu in the Add Action dialog and select the option to show Azure functions in the same region. Select the Function App you created earlier and select the function that returns the interval start.
- Enter an empty pair of curly brackets, "{}", to pass an empty payload object to the function.
- Add the HTTP + Swagger action and enter the swagger URL of the API Server:
http://MySite:MyPort/api.rsc/@MyAuthtoken/$oas - Select the "Return Account" operation.
Use the descriptions for each property to specify additional parameters such as the columns to retrieve, filters, etc. Below is an example filter:
Industry eq 'Floppy Disks'
The API Server returns the descriptions and other documentation in the swagger document. You can find more information on using the OData API and supported OData in the API Server help documentation.
To use the datetime value returned from the getInterval function, use the "ge" operator with a datetime column in the Account table and select the Body parameter in the dialog. Note that quotes must be used to surround the datetime value.
![An OData filter on the results of an Azure Function App, getToday. (Salesforce is shown.)]()
Switch to Code View and modify the $filter expression to extract the property containing the start of the interval. Use the syntax '@{body('MyFunc')['MyProp']'.
"getAllAccount": {
  "inputs": {
    "method": "get",
      "queries": {
        "$filter": "CreatedDate ge '@{body('getInterval')['start']}'"
      },
      "uri": "https://MySite:MyPort/api.rsc/@MyAuthtoken/Account"
  }
You can now access Certinia as data sources and destinations in your workflows.
Email New Records
Follow the steps below to email a report with any new Account entities.
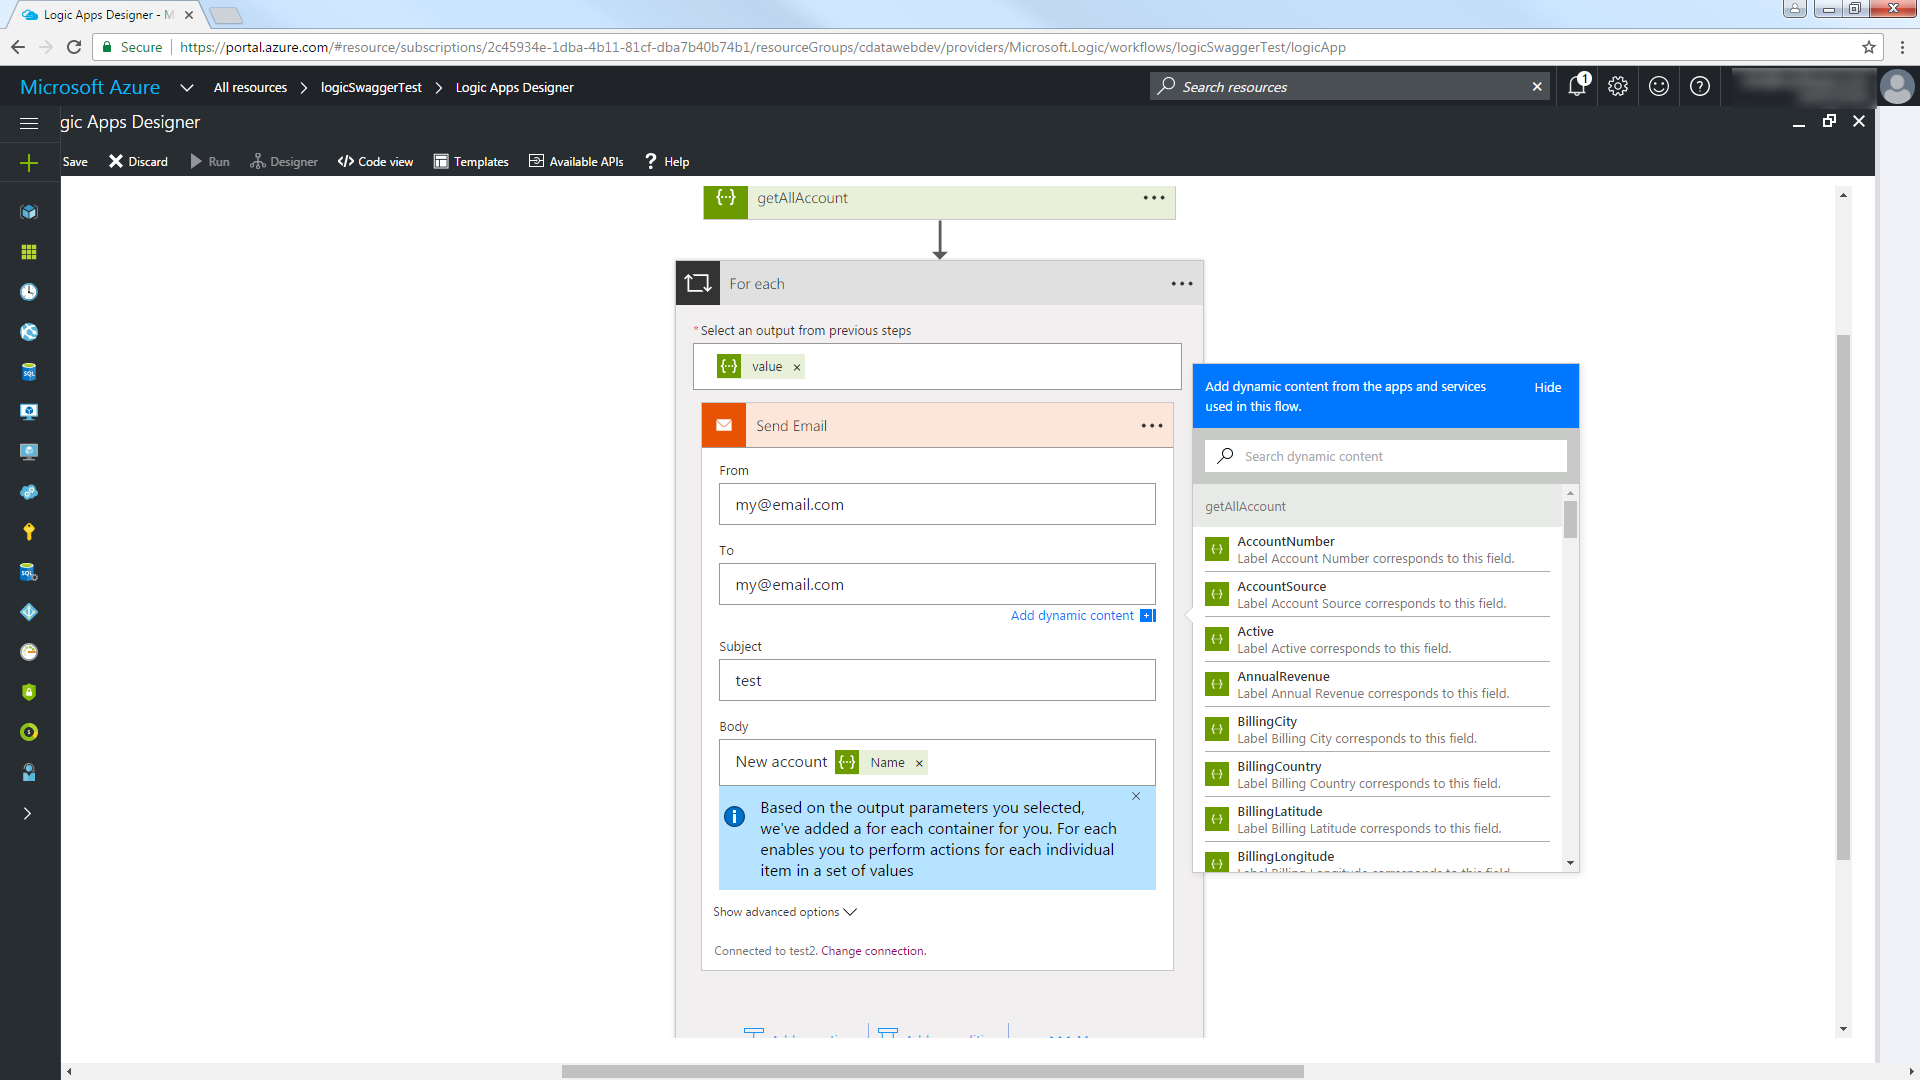
- In the Logic Apps Designer, add an SMTP - Send Email action.
- Configure the necessary information for the SMTP server.
- Configure the From, To, Subject, and Body. You can add parameters from the Certinia columns returned.
Click Save and then click Run to send email notifications on any Certinia records created in the last hour.


