Discover how a bimodal integration strategy can address the major data management challenges facing your organization today.
Get the Report →


Ready to get started?
Download a free trial of the ADP Driver to get started:
Download NowLearn more:
Rapidly create and deploy powerful Java applications that integrate with ADP.
Integrate ADP Data in Your Informatica Cloud Instance
Use the CData JDBC Driver for ADP with the Informatica Cloud Secure Agent to access live ADP data from Informatica Cloud.
Informatica Cloud allows you to perform extract, transform, and load (ETL) tasks in the cloud. With the Cloud Secure Agent and the CData JDBC Driver for ADP, you get live access to ADP data, directly within Informatica Cloud. In this article, we will walk through downloading and registering the Cloud Secure Agent, connecting to ADP through the JDBC Driver and generating a mapping that can be used in any Informatica Cloud process.
Informatica Cloud Secure Agent
To work with the ADP data through the JDBC Driver, install the Cloud Secure Agent.
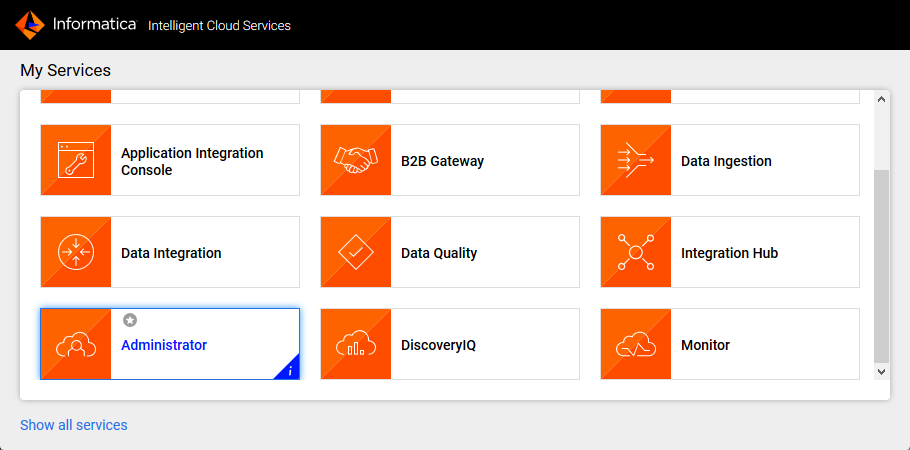
- Navigate to the Administrator page in Informatica Cloud
![]()
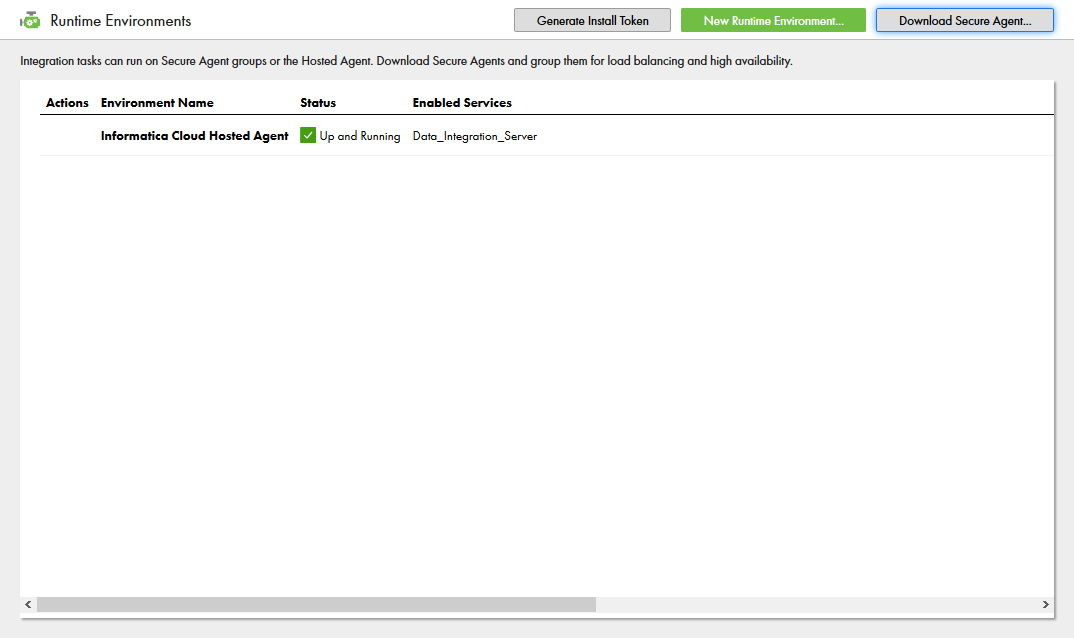
- Select the Runtime Environments tab
- Click "Download Secure Agent"
![]()
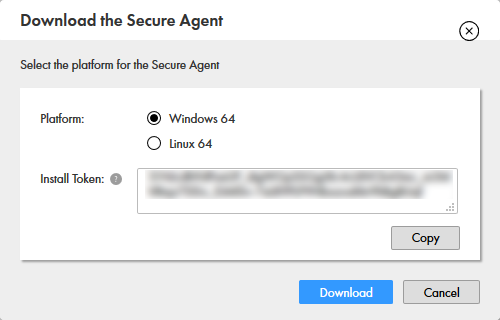
- Make note of the Install Token
![]()
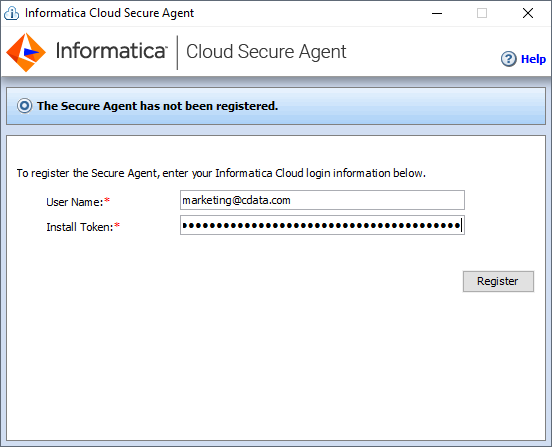
- Run the installer on the client machine and register the Cloud Secure Agent with your username and install token
![]()
NOTE: It may take some time for all of the Cloud Secure Agent services to get up and running.
Connecting to the ADP JDBC Driver
With the Cloud Secure Agent installed and running, you are ready to connect to ADP through the JDBC Driver. Start by clicking the Connections tab and clicking New Connection. Fill in the following properties for the connection:
- Connection Name: Name your connection (i.e.: CData ADP Connection)
- Type: Select "JDBC_IC (Informatica Cloud)"
- Runtime Environment: Select the runtime environment where you installed the Cloud Secure Agent
- JDBC Connection URL: Set this to the JDBC URL for ADP. Your URL will look similar to the following:
jdbc:adp:OAuthClientId=YourClientId;OAuthClientSecret=YourClientSecret;SSLClientCert='c:\cert.pfx';SSLClientCertPassword='admin@123'InitiateOAuth=GETANDREFRESH;Connect to ADP by specifying the following properties:
- SSLClientCert: Set this to the certificate provided during registration.
- SSLClientCertPassword: Set this to the password of the certificate.
- UseUAT: The connector makes requests to the production environment by default. If using a developer account, set UseUAT = true.
- RowScanDepth: The maximum number of rows to scan for the custom fields columns available in the table. The default value will be set to 100. Setting a high value may decrease performance.
The connector uses OAuth to authenticate with ADP. OAuth requires the authenticating user to interact with ADP using the browser. For more information, refer to the OAuth section in the Help documentation.
Built-In Connection String Designer
For assistance in constructing the JDBC URL, use the connection string designer built into the ADP JDBC Driver. Either double-click the .jar file or execute the .jar file from the command-line.
java -jar cdata.jdbc.adp.jarFill in the connection properties and copy the connection string to the clipboard.
")
- JDBC Jar Directory: Set this to the lib folder in the installation location for the JDBC Driver (on Windows, typically C:\Program Files\CData[product_name]\)
- Driver Class: Set this to cdata.jdbc.adp.ADPDriver
- Username: Set this to a placeholder value (since ADP does not require a username)
- Password: Set this to a placeholder value (since ADP does not require a password)
")

Create a Mapping for ADP Data
With the connection to ADP configured, we can now access ADP data in any Informatica process. The steps below walk through creating a mapping for ADP to another data target.
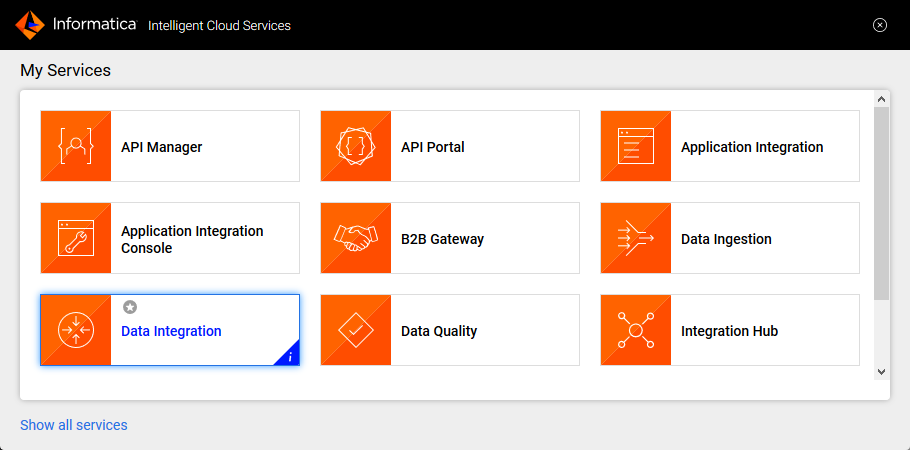
- Navigate to the Data Integration page
![]()
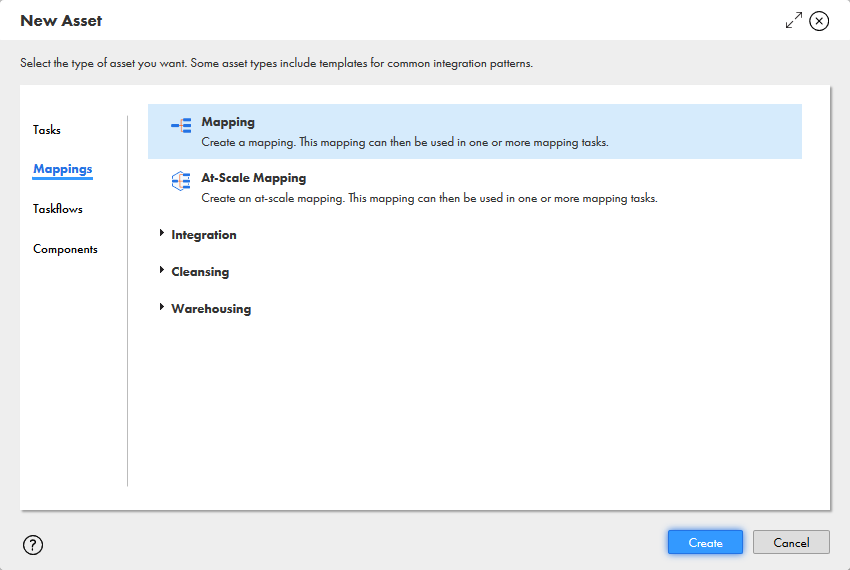
- Click New.. and select Mapping from the Mappings tab
![]()
- Click the Source Object and in the Source tab, select the Connection and set the Source Type

- Click "Select" to choose the table to map

- In the Fields tab, select the fields from the ADP table to map

- Click the Target object and configure the Target source, table and fields. In the Field Mapping tab, map the source fields to the target fields.


With the mapping configured, you are ready to start integrating live ADP data with any of the supported connections in Informatica Cloud. Download a free, 30-day trial of the CData JDBC Driver for ADP and start working with your live ADP data in Informatica Cloud today.
Data Connectors
ETL/ ELT Solutions
Cloud & API Connectivity
OEM & Custom Drivers