Discover how a bimodal integration strategy can address the major data management challenges facing your organization today.
Get the Report →


Using CData JDBC Drivers in ColdFusion
The CData JDBC Drivers can be used in any environment that supports loading a JDBC Driver. In this tutorial we will explore using the CData JDBC Driver for Salesforce from within ColdFusion.
To begin, this tutorial will assume that you have already installed the CData JDBC Driver for Salesforce as well as Adobe ColdFusion v10, and that you already have a Salesforce account and security token.
-
Add the CData JDBC Driver to ColdFusion's lib directory.
Copy the JDBC Driver for Salesforce and lic file from "C:\Program Files\CData\CData JDBC Driver for Salesforce V3\lib" to "C:\ColdFusion10\cfusion\wwwroot\WEB-INF\lib".
cdata.jdbc.salesforce.jar
		cdata.jdbc.salesforce.lic
Note: If you do not copy the .lic file with the jar, you will see a licensing error that indicates you do not have a valid license installed. This is true for both the trial and full versions.
-
Add the CData JDBC Driver for Salesforce as a data source.
From the ColdFusion administrator interface, choose "Data Sources" from "Data & Services". Here you will want to "Add New Data Source". The data source name can be any name, provided it conforms to the ColdFusion variable naming conventions. For driver, choose "other", then click the "Add" button.
![]()
-
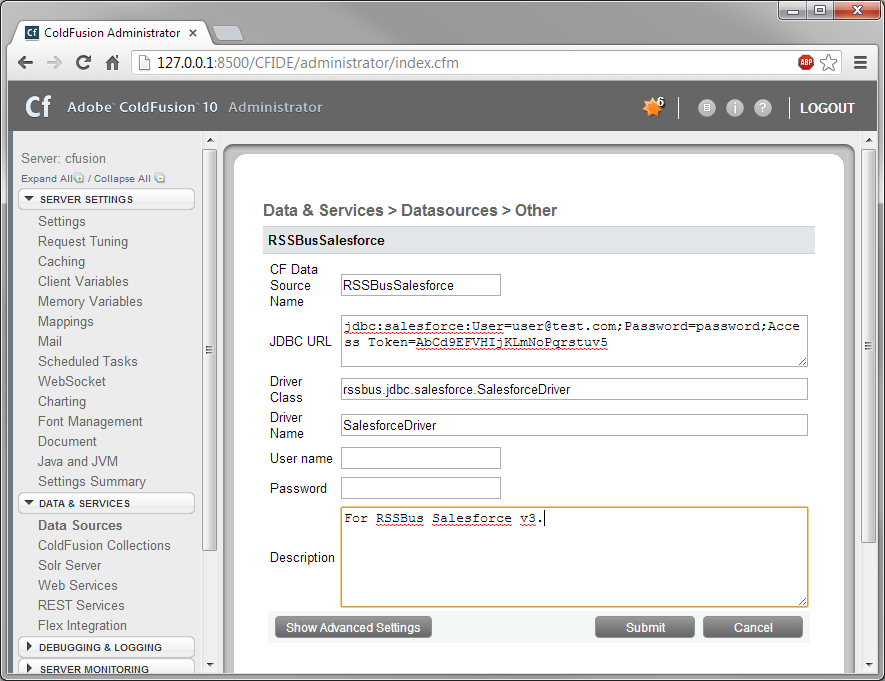
Populate the driver properties.
JDBC URL will need to be in the format: jdbc:salesforce:<connectionString>. For Salesforce, the connection string must include User, Password, and AccessToken, for example:
jdbc:salesforce:User=username@test.com;Password=password;Access Token=AbCxYz
Driver Class is: cdata.jdbc.salesforce.SalesforceDriver
The driver name is used to recognize the data source in the ColdFusion administration console.
![]()
-
Test the connection to the data source
You can now test the connection by pressing the check mark to the left of the CDataSalesforce data source you just created.
![]() The data source should report an "OK" status, and should now be ready for use.
The data source should report an "OK" status, and should now be ready for use.
-
Creating the ColdFusion Markup File.
Next, create a new ColdFusion Markup file (.cfm) and place it in the wwwroot ("C:\ColdFusion10\cfusion\wwwroot") directory for ColdFusion.
The following code can be used to query the data source:
<cfquery name="SalesforceQuery" dataSource="CDataSalesforce">
  SELECT * FROM Account
</cfquery>
And a CFTable can be used to quickly output the table in HTML:
<cftable
  query = "SalesforceQuery"
  border = "1"
  colHeaders
  colSpacing = "2"
  headerLines = "2"
  HTMLTable
  maxRows = "500"
  startRow = "1"/>

  <cfcol header="<b>ID</b>" align="Left" width=2 text="#Id#"/>
  <cfcol header="<b>Name</b>" align="Left" width=15 text="#Name#"/>
  <cfcol header="<b>Phone</b>" align="Center" width=12 text="#Phone#"/>
  <cfcol header="<b>Billing Street</b>" align="Center" width=25 text="#Billingstreet#"/>
  <cfcol header="<b>Billing City</b>" align="Center" width=15 text="#Billingcity#"/>
  <cfcol header="<b>Billing State</b>" align="Center" width=5 text="#Billingstate#"/>
</cftable>
Full code, including the HTML portion is available below:
<html> <head><title>Hello World</title></head> <body> <cfoutput>#ucase("hello world")#</cfoutput> <cfquery name="SalesforceQuery" dataSource="CDataSalesforce"> SELECT * FROM Account </cfquery> <cftable query = "SalesforceQuery" border = "1" colHeaders colSpacing = "2" headerLines = "2" HTMLTable maxRows = "500" startRow = "1"> <cfcol header="<b>ID</b>" align="Left" width=2 text="#Id#"/> <cfcol header="<b>Name</b>" align="Left" width=15 text="#Name#"/> <cfcol header="<b>Phone</b>" align="Center" width=12 text="#Phone#"/> <cfcol header="<b>Billing Street</b>" align="Center" width=25 text="#Billingstreet#"/> <cfcol header="<b>Billing City</b>" align="Center" width=15 text="#Billingcity#"/> <cfcol header="<b>Billing State</b>" align="Center" width=5 text="#Billingstate#"/> </cftable> </body> </html> -
Run the code!
Running the code above, in a browser, should produce the following output:
![]()
-
Using Parameterized Queries
Parameterized queries are also supported by the CData JDBC Drivers using the <cfqueryparam> element. For example:
SELECT * FROM Account WHERE name = <cfqueryparam value="Insert Coldfusion Test">

 The data source should report an "OK" status, and should now be ready for use.

If you have any questions, comments, or feedback regarding this tutorial, please contact us at support@cdata.com.
Data Connectors
ETL/ ELT Solutions
Cloud & API Connectivity
OEM & Custom Drivers