Discover how a bimodal integration strategy can address the major data management challenges facing your organization today.
Get the Report →How to Build Dynamic React Apps with HCL Domino Data
Use the CData Connect and React to Build Dynamic Web Apps with Live HCL Domino Data.
React is a declarative, efficient, and flexible JavaScript library for building user interfaces. CData Connect enables you to generate REST APIs for dozens of SaaS, Big Data, and NoSQL data sources. This article walks through setting up CData Connect Server to create an OData API for HCL Domino and creating a simple React web application that has live access to the HCL Domino data. The React app dynamically builds and populates an HTML table based on the HCL Domino data. While the article steps through most of the code, you can download the sample React project to see the full source code and test the functionality for yourself.
Connect to HCL Domino from React
To work with live HCL Domino data in our React app, we need to connect to HCL Domino from Connect, provide user access to the new virtual database, and create OData endpoints for the HCL Domino data.
Add a Connect User
Create a User to connect to HCL Domino from Reveal through Connect.
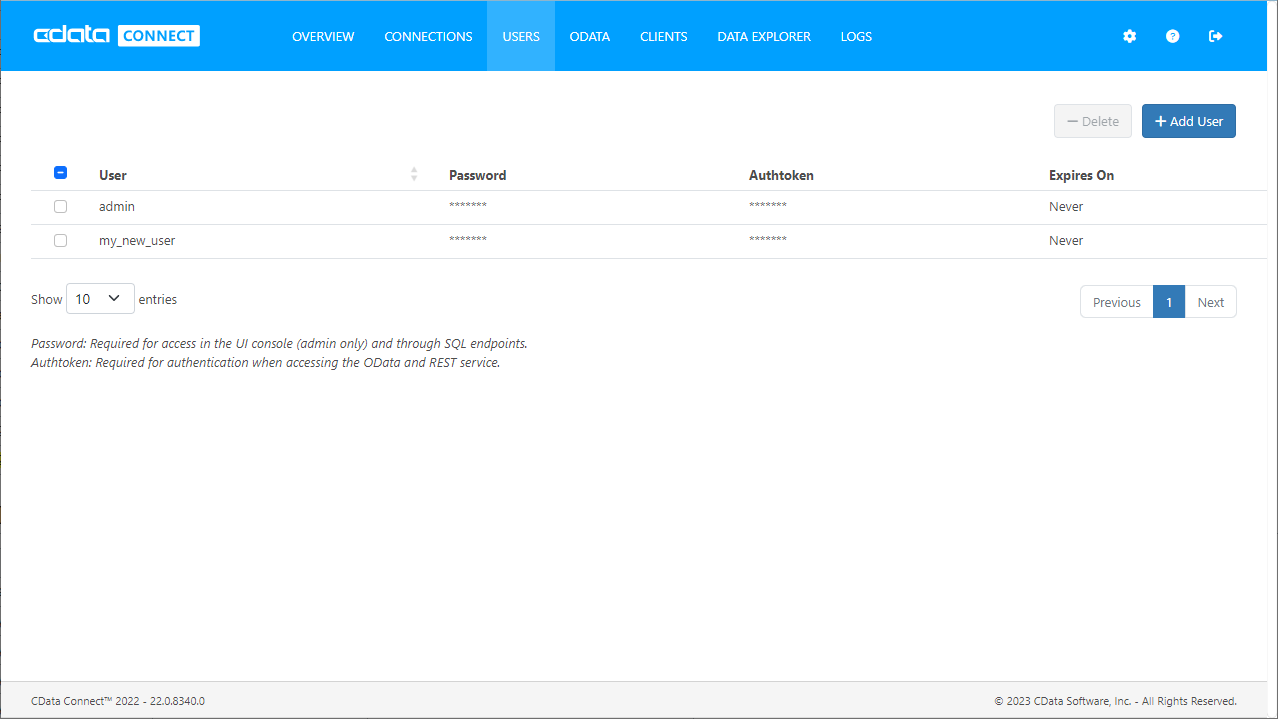
- Click Users -> Add
- Configure a User
![Creating a new user]()
- Click Save Changes and make note of the Authtoken for the new user
![Connect users]()
Connect to HCL Domino from Connect
CData Connect uses a straightforward, point-and-click interface to connect to data sources and generate APIs.
- Open Connect and click Connections
![Adding a connection]()
- Select "HCL Domino" from Available Data Sources
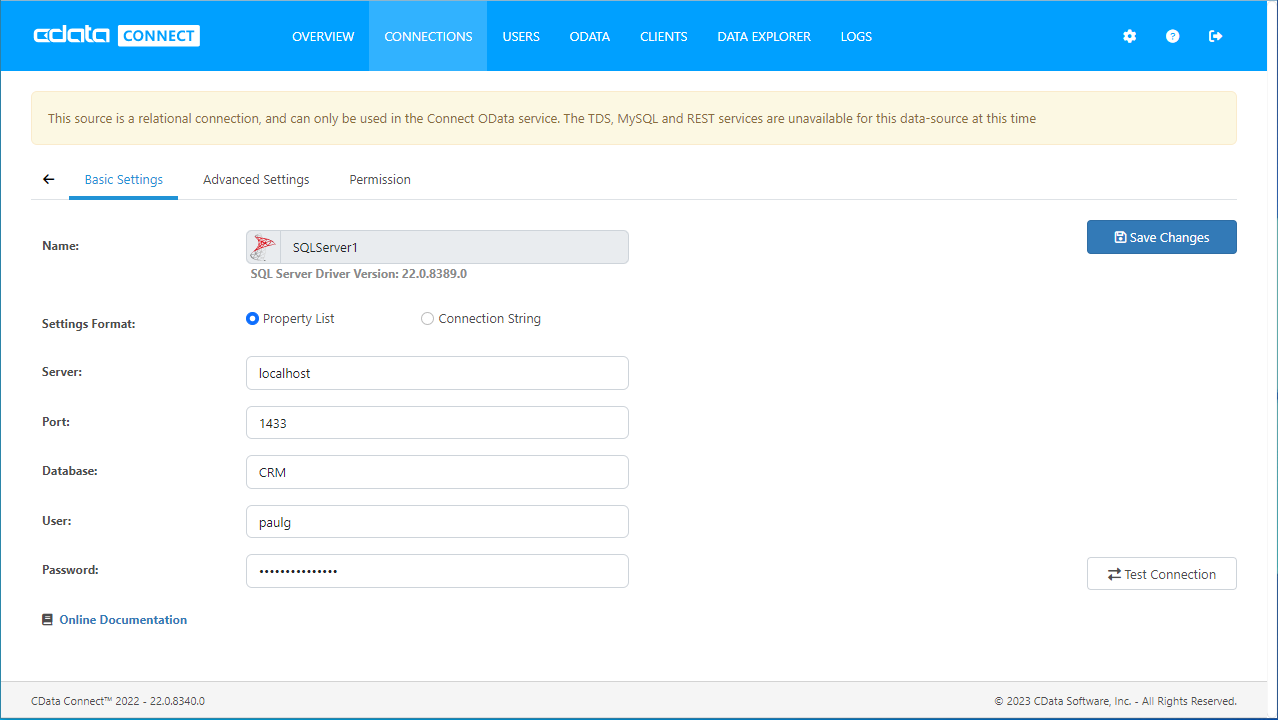
- Enter the necessary authentication properties to connect to HCL Domino.
Connecting to Domino
To connect to Domino data, set the following properties:
- URL: The host name or IP of the server hosting the Domino database. Include the port of the server hosting the Domino database. For example: http://sampleserver:1234/
- DatabaseScope: The name of a scope in the Domino Web UI. The driver exposes forms and views for the schema governed by the specified scope. In the Domino Admin UI, select the Scopes menu in the sidebar. Set this property to the name of an existing scope.
Authenticating with Domino
Domino supports authenticating via login credentials or an Azure Active Directory OAuth application:
Login Credentials
To authenticate with login credentials, set the following properties:
- AuthScheme: Set this to "OAuthPassword"
- User: The username of the authenticating Domino user
- Password: The password associated with the authenticating Domino user
The driver uses the login credentials to automatically perform an OAuth token exchange.
AzureAD
This authentication method uses Azure Active Directory as an IdP to obtain a JWT token. You need to create a custom OAuth application in Azure Active Directory and configure it as an IdP. To do so, follow the instructions in the Help documentation. Then set the following properties:
- AuthScheme: Set this to "AzureAD"
- InitiateOAuth: Set this to GETANDREFRESH. You can use InitiateOAuth to avoid repeating the OAuth exchange and manually setting the OAuthAccessToken.
- OAuthClientId: The Client ID obtained when setting up the custom OAuth application.
- OAuthClientSecret: The Client secret obtained when setting up the custom OAuth application.
- CallbackURL: The redirect URI defined when you registered your app. For example: https://localhost:33333
- AzureTenant: The Microsoft Online tenant being used to access data. Supply either a value in the form companyname.microsoft.com or the tenant ID.
The tenant ID is the same as the directory ID shown in the Azure Portal's Azure Active Directory > Properties page.
![Configuring a connection (SQL Server is shown).]()
- Click Save Changes
- Click Privileges -> Add and add the new user (or an existing user) with the appropriate permissions (SELECT is all that is required for Reveal).
Add HCL Domino OData Endpoints in Connect
After connecting to HCL Domino, create OData Endpoints for the desired table(s).
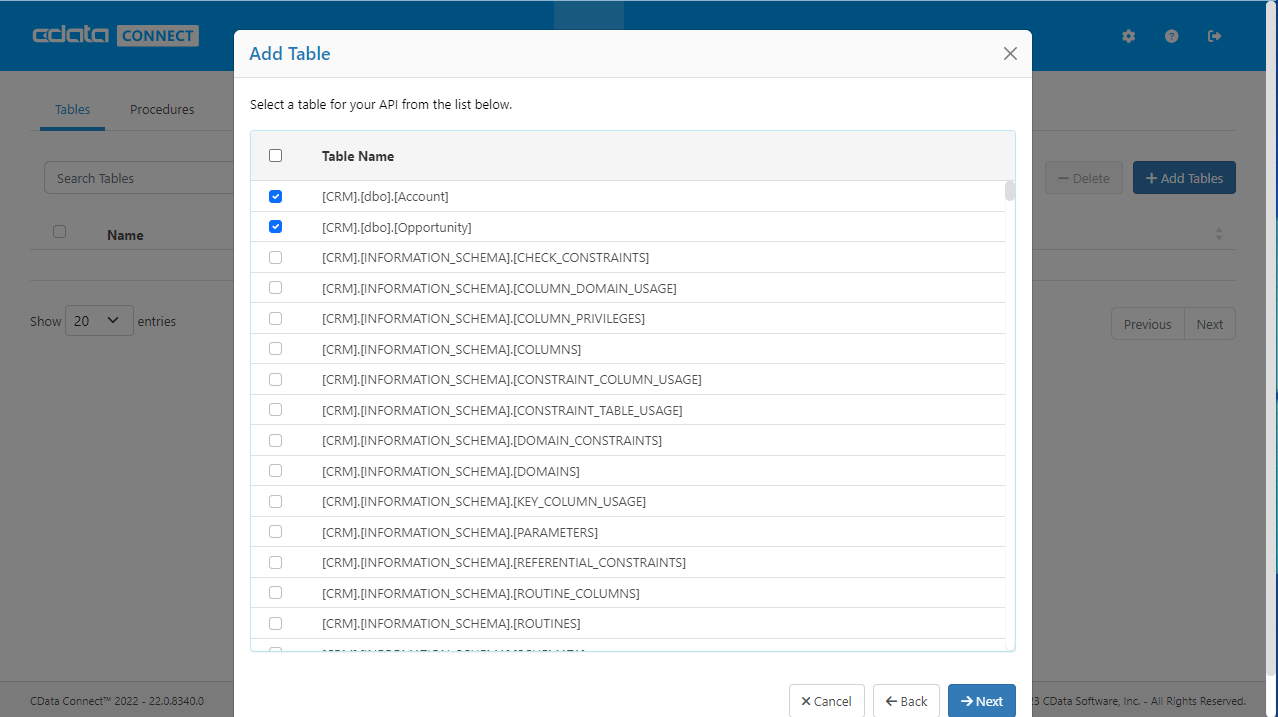
- Click OData -> Tables -> Add Tables
- Select the HCL Domino database
- Select the table(s) you wish to work with and click Next
![Selecting a Table (SQL Server is shown)]()
- (Optional) Edit the table definition to select specific fields and more
- Save the settings
(Optional) Configure Cross-Origin Resource Sharing (CORS)
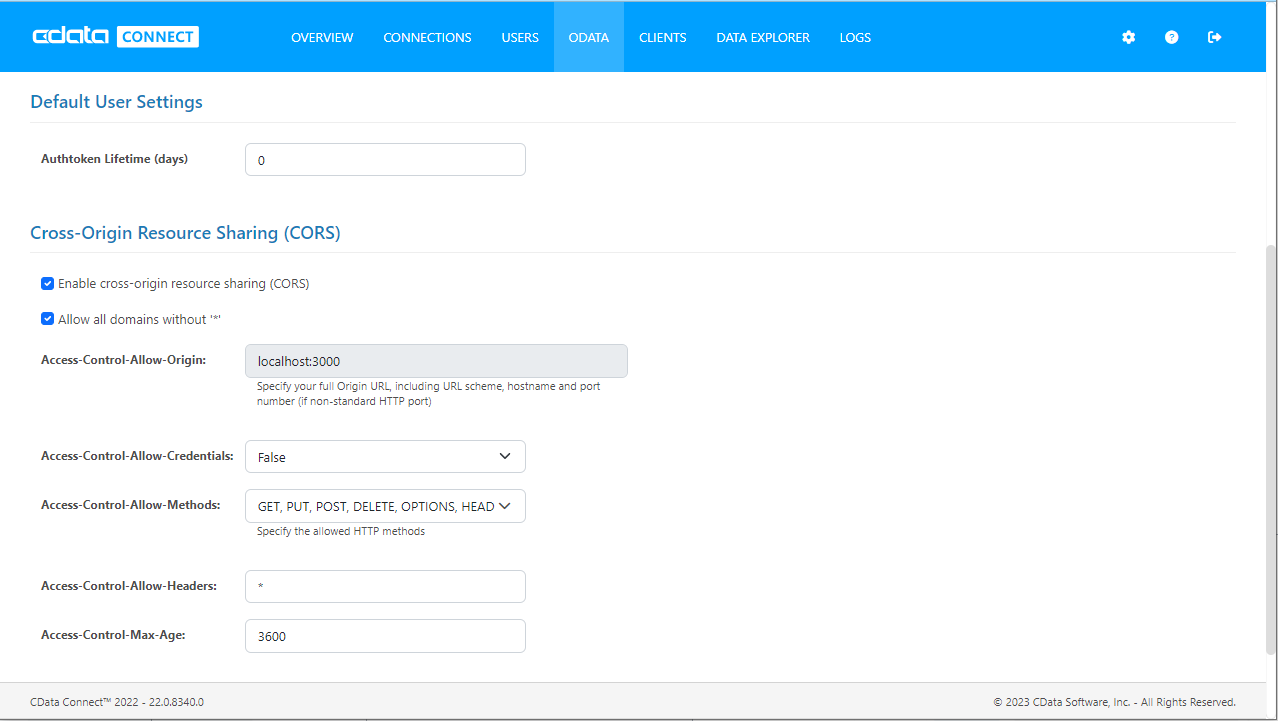
When accessing and connecting to multiple different domains from an application such as Ajax, there is a possibility of violating the limitations of cross-site scripting. In that case, configure the CORS settings in OData -> Settings.
- Enable cross-origin resource sharing (CORS): ON
- Allow all domains without '*': ON
- Access-Control-Allow-Methods: GET, PUT, POST, OPTIONS
- Access-Control-Allow-Headers: Authorization
Save the changes to the settings.
Sample URLs for OData Feeds
Once you have configured a connection to HCL Domino, created a user, and created OData endpoints in Connect Server, you can access OData feeds for HCL Domino data. Below, you will see the URLs to access tables and the list of tables. For information on accessing the tables, you can navigate to the API page for Connect (click the API link on the top right of the Connect Server webpage). For the URLs, you will need the URL of the Connect instance, likely in the form: https://connect_server_url or http://localhost:8080. Since we are working with React, we will append the @json parameter to the end of URLs that do not return JSON data by default.
Connect Server URLs
| Table | URL | |
|---|---|---|
| Entity (table) List | https://connect_server_url/api.rsc/ | |
| Metadata for table ByName | https://connect_server_url/api.rsc/ByName/$metadata?@json | |
| ByName | https://connect_server_url/api.rsc/Domino_ByName |
Connect On-Prem (Server) URLs
| Table | URL | |
|---|---|---|
| Entity (table) List | http://localhost:8080/odata.rsc/ | |
| Metadata for table ByName | http://localhost:8080/odata.rsc/ByName/$metadata?@json | |
| ByName | http://localhost:8080/odata.rsc/Domino_ByName |
As with standard OData feeds, if you wish to limit the fields returned, you can add a $select parameter to the query, along with other standard OData URL parameters, such as $filter, $orderby, $skip, and $top. See the help documentation for more information on supported OData queries.
Building a React Web Application
With Connect Server setup completed, you are ready to build the sample React app. The following steps walk through the source files for the React app contained in the .zip file, making note of any relevant sections of code.
index.html
This is the home page of the sample React web application. It fleshes out the HTML head and body and identifies the container and the script to display the web application.
main.js
This TypeScript file imports the necessary libraries, modules, and React class. The properties, or props, for the main React class are defined here as well.
package.json
This JSON file contains the properties, including dependencies, of the React app. This file is generated automatically.
webpack.config.js
This JavaScript file defines various configurations for the React app.
App.jsx
This JavaScript XML file contains the code needed to build the React app. The class App contains all of the functions needed to retrieve data from Connect Server and render the different parts of the React app. The methods are described below.
constructor
The constructor of the App class. In it, the state contains the dynamic data used to build the web app. You can also bind other methods on this so that you can modify the state within those methods.
  constructor(props) {
    super(props);

    this.state = {
      selectedTable: '',
      selectedColumns: [],
      tables: [],
      columns: [],
      tableData: [],
      auth: 'Basic ' + btoa(props.user + ':' + props.pass),
    };

    this.onTableChange = this.onTableChange.bind(this);
    this.onColumnChange = this.onColumnChange.bind(this);
    this.renderTableHeaders = this.renderTableHeaders.bind(this);
    this.renderTableBody = this.renderTableBody.bind(this);
    this.getColumnList = this.getColumnList.bind(this);
    this.getData = this.getData.bind(this);

  }
componentDidMount
As per the React specification, the componentDidMount method is called before the render method and can be used to update the state variables of the app, after the constructor has run. In this method, you can send the HTTP request to Connect Server for the list of tables and set the tables and selectedTable state variables.
In the sample, a call to the getColumnList method retrieves the list of available columns for the first (and currently selected) table.
  componentDidMount() {
    Object.assign(axios.defaults, {headers: {"x-cdata-authtoken": this.state.auth}});
    axios.get(`${this.props.baseUrl}`)
      .then(res => {
        const tables = res.data.value;
        this.setState({ tables });
        this.setState({ selectedTable: tables[0].name});
      })
      .catch(function (error) {
        if (error.response) {
          alert('Code: '
            + error.response.data.error.code
            + '\r\nMessage: '
            + error.response.data.error.message);
        } else {
          console.log('Error', error.message);
        }
      });
    this.getColumnList();
  }
getColumnList
This function retrieves the list of columns available for the selectedTable parameter (or the table currently selected in the UI if the parameter is undefined). It performs the HTTP request and parses the response, setting the columns and selectedColumns states.
  getColumnList(selectedTable) {
    if (!selectedTable) {
      selectedTable = this.state.selectedTable;
    }
    Object.assign(axios.defaults, {headers: {"x-cdata-authtoken": this.state.auth}});
    axios.get(`${this.props.baseUrl}/${selectedTable}/$metadata?@json`)
      .then(res => {
        let columns = res.data.items[0]["odata:cname"];
        this.setState({
          columns,
          selectedColumns: [],
        });
      })
      .catch(error => {
        if (error.response) {
          alert('Code: '
            + error.response.data.error.code
            + '\r\nMessage: '
            + error.response.data.error.message);
        } else {
          console.log('Error', error.message);
        }
      });
  }
renderTableList
This function uses the tables state variable to build out the options for the HTML drop-down select for selecting a table.
renderTableList() {
let tablesHTML = [];
for (let i = 0; i < this.state.tables.length; i++) {
let table = this.state.tables[i];
tablesHTML.push();
}
return tablesHTML;
}
renderColumnList
This function uses the columns state variable to build out the options for the HTML multi-select for selecting columns.
renderColumnList() {
let columnsHTML = [];
for (let i = 0; i < this.state.columns.length; i++){
let column = this.state.columns[i];
columnsHTML.push();
}
return columnsHTML;
}
renderTable
This function provides the basic framework for the HTML table based on the data retrieved from Connect Server. It uses two helper functions, renderTableHeaders() and renderTableBody(), to build the table headers and data rows.
  renderTable() {
    return (
      <table>
        <thead>
          { this.renderTableHeaders() }
        </thead>
        { this.renderTableBody() }
      </table>
    );
  }
renderTableHeaders
This function uses the selectedColumns state variable to build out the headers for the HTML table used to display the data from Connect Server.
  renderTableHeaders() {
    let headers = [];
    for (let i = 0; i < this.state.selectedColumns.length; i++) {
      let col = this.state.selectedColumns[i];
      headers.push(<th key={col}>{col}</th>)
    }
    return (<tr>{headers}</tr>);
  }
renderTableBody
This function uses the tableData and selectedColumns state variables to build out the data rows for the HTML table used to display the data from Connect Server.
  renderTableBody() {
    let rows = [];
    this.state.tableData.forEach(function(row) {
      rows.push(
        <tr key={btoa('row'+rows.length)}>
          {this.state.selectedColumns.map(col =>
            <td key={col}>{row[col]}</td>
          )}
        </tr>
      )
    }.bind(this));
    return (<tbody>{rows}</tbody>);
  }
getData
This function retrieves the data from Connect Server, building a list for the $select parameter based on the selectedColumns state variable and using the selectedTable state variable to determine which table to request data from. The data returned by Connect Server is stored in the tableData state variable.
  getData() {
    let columnList = '';
    columnList = this.state.selectedColumns.join(',');
    Object.assign(axios.defaults, {headers: {"x-cdata-authtoken": this.state.auth}});
    axios.get(`${this.props.baseUrl}/${this.state.selectedTable}/?$select=${columnList}`)
      .then(res => {
        const tableData = res.data.value;
        this.setState({ tableData });
      })
      .catch(error => {
        if (error.response) {
          alert('Code: '
            + error.response.data.error.code
            + '\r\nMessage: '
            + error.response.data.error.message);
        } else {
          console.log('Error', error.message);
        }
      });
  }
onTableChange
This function handles the change event on the HTML drop-down select for choosing a table. In the function, the selectedTable state variable is set to the selected value and the tableData state variable is cleared of all values. Also, a call to the getColumnList function updates the HTML multi-select element for choosing columns.
  onTableChange(event) {
    const selectedTable = event.target.value;
    this.setState({
      selectedTable,
      tableData: [],
    });
    this.getColumnList(selectedTable);
  }
onColumnChange
This function handles the change event on the HTML multi-select for choosing columns to retrieve and display. After determining which columns are selected, the selectedColumns state variable is updated and the tableData state variable is cleared.
  onColumnChange(event) {
    let options = event.target.options;
    let selectedColumns = [];
    for (let i = 0; i < options.length; i++){
      if (options[i].selected){
        selectedColumns.push(options[i].value);
      }
    }
    this.setState({
      selectedColumns,
      tableData: [],
      });
  }
render
This function is the function that controls the layout and display of the various HTML elements. It contains all of the static HTML features, as well as function calls to those functions that render the dynamic elements.
  render() {
    return (
      <div>
        <h1>CData Connect Server React Demo</h1>
        <br/>
        <label>Select a Table</label>
        <br/>
        <select className='tableDropDown' onChange={this.onTableChange}>
          { this.renderTableList() }
        </select>
        <br/>
        <br/>
        <label>Select {this.state.selectedTable} Columns</label>
        <br/>
        <select className='columnMultiSelect' onChange={this.onColumnChange} multiple>
          { this.renderColumnList() }
        </select>
        <br/>
        <br/>
        { this.state.selectedColumns.length > 0
          ? <button onClick={this.getData}>Get [{ this.state.selectedTable }] Data</button>
          : null }
        <br/>
        <br/>
        { this.state.tableData.length > 0
          ? this.renderTable()
          : null }
      </div>
    );
  }
Configuring the React App
With the connection to data configured and the source files for the React app reviewed, you are now ready to run the React web application. You need to have node.js installed on your machine in order to run the React app. There are several modules that you also need to install before you can run the application.
Global Modules
In order to run the React App, install the babel and babel-cli modules globally from the command line:
- npm install -g babel
- npm install -g babel-cli
Setting Up the Project
In the next steps, you will set up your React project, creating and populating your package.json file.
In the command line, navigate to the directory with the source files:
cd ./apiserver-react
-
Once in the directory, install the necessary modules using the preconfigured package.json file:
npm install
Running the React App
Now that you have created your package.json file and installed the necessary modules, you are ready to run the React app. To do so, you can simply navigate to the directory for the React app in a command-line interface and execute the following command:
npm start
When the React app launches, the title and a drop-down menu to select a table are displayed. The list of tables is retrieved from the Connect Server and includes all of the tables you added as OData endpoints when configuring Connect Server.

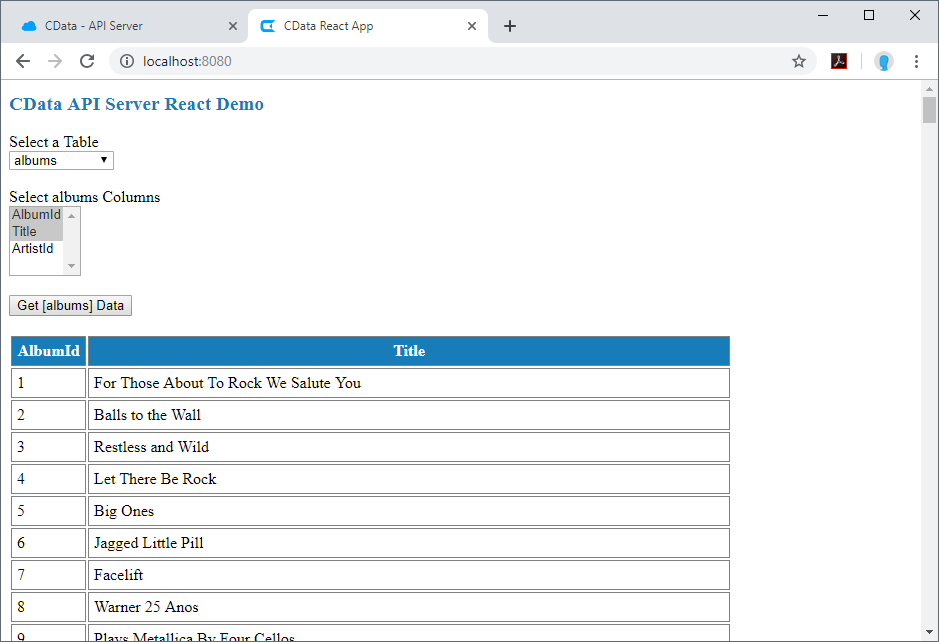
When you select a table, the drop-down, multi-select menu for columns appears, and you can then select the columns you wish to see in your table. As you select columns, the table headers appear.
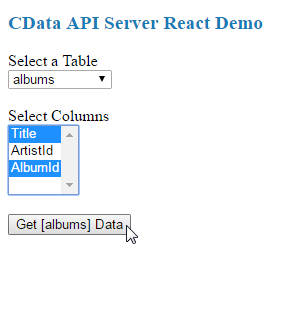
Once you select the table and columns, you can click the Get [ByName] Data button to retrieve data from your database via the API Server. The HTML table will be populated with data based on the table and columns you selected before clicking on the button.
Free Trial & More Information
Now that you have accomplished the steps needed to connect to your database data in dynamic webpages, sign up for a trial of Connect Server to start building dynamic webpages using live data from your cloud-based SaaS, Big Data, and NoSQL sources, including HCL Domino! As always, our world-class support team is ready to answer any questions you may have.


